Do you know about how to create a shopify partner account?
When you join the Shopify Partner Account , you unlock revenue possibilities and tap into a thriving network of Shopify merchants. This straightforward guide will help you kickstart your journey and maximize your Shopify Partner Account.
Joining the shopify partner account – for a successful business
Developing an application for Shopify is enjoyable and easy because Shopify provides numerous applications and resources that users can easily utilize. This guide will cover all of the steps from development environment installation to your app distribution. It has a guide for making an Instagram feed app, with step-by-step instructions. This helps understand the steps discussed.
What is the process of shopify partner account?
Here we are describing some steps of a shopify partner account. some steps of shopify partner accounts.
Step-1: Setting Up Your Shopify Partner Account
The newly launched consultation journey starts from creating a Shopify Partner account. Thus, if you did not have an account, you would have to get one before proceeding with the next steps. Here’s how to do it. Let us discuss some steps.
To open a Shopify account, start by signing up or logging in. Then, visit the official Shopify Partner Program page. If you don’t have an account yet, create one. If you already have an account, just log in.
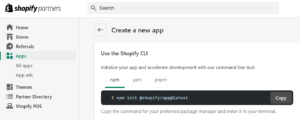
Navigate to Apps: After logging in to the portal go to the ‘Apps’ tab.
Create a New App: Go to ‘Create App’ and enter app name and URL for the app. This process will create important credentials, such as the API key and secret key-API, that are necessary for your application.
Step 2: Initializing Your Shopify App
Congratulations! You have successfully opened your Shopify Partner Account. Now, it’s time to start your Shopify application. Open your terminal and run the following command:
npm init @shopify/app@latest
This command pulls up your app and creates a shopify.app.toml file. This config file contains details like client id, the name of your application, URL of your application and the scopes needed for the application. Furthermore, you will have to prepare a . file named env and then specify SHOPIFY_API_KEY.

Step 3: Installing Dependencies
To ensure your app has all the necessary dependencies to function correctly, run the following command in your terminal
npm install
This command installs all the packages needed in your application .In this case is React.js for the frontend and Node.js for the backend.
Step 4: Running Your Application
Once all dependencies are installed, you can start your development server by running
npm run dev
Step 5: Building the Frontend and Backend
Again, for our instance, we will be developing the frontend of the app using the help of the React library of JavaScript and the backend with Node. Here’s a brief overview of how to set up both. let describe some steps.
Frontend with React.js
Create React Components: Create React components to be used within your application for headers, footers and other sections of your application.
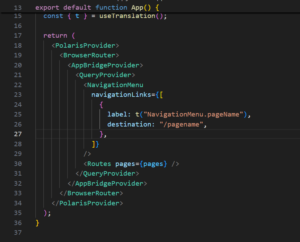
Navigation Links: As to create different pages, the labels and destinations have to be included in the navigation Link component in App.jsx. That way, you are able to surf from one area of your application to the other.

Backend with Node.js
Set Up Express Server: Please use express Js to set up your server and control the backend procedures.
API Routes: Define API routes which will handle the request and response between the front end and the back end.
Practical Example: Instagram Feed App…
Let’s apply the above steps to create a practical example: an application that is used in feeding the user’s Instagram account. This application will let the users login through the Instagram account, pull the media, and then the media can be showcased in a grid or slider view.
Main Functionality
The landing page of the app features a button which says “Connect to Instagram.” When the users tap on this button, they are transferred to the Instagram login page. If the login is complete, the app will retrieve pictures and videos from their Instagram profile and provide it in slider or grid view.
Authentication and Authorization
We use an authentication URL containing the following parameters: In this method, the parameters included are client Id, redirect Uri, scope, response Type, and auth Url. This URL corresponds to the redirection to Instagram’s login page. Once a user logs in, Instagram gives an authorization ID and using this ID, an access token is given by our back end..

Here is how the process works in detail.
Auth URL: Create an auth URL with the necessary parameters.
Redirect and authorization: Redirect users to Instagram’s login page. Once successfully logged in, get a license ID.
Access token request: To request an access token from the backend, use an authorization ID with client id, client secret, grant type, and redirect uri.
Introducing news reports and displaying content
Once we have the access token, we can then retrieve all the media id from the user’s Instagram profile. We use these media id to retrieve the URLs of the images and videos. These media items are then displayed in our app, which has various styling options.
Here is a detailed analysis of this phenomenon.
Retrieve Media IDs : Use an access token to retrieve media IDs from the Instagram API.
Accept media URLs : Assign a corresponding media URL (image or video) for each media ID.
Display Media: Use React components to display media objects in a grid or slider format.
Optimizing the Instagram feed
One of the main features of our app is that we can customize the Instagram feed. Here are some options to change.
Width: Adjusts the spacing between images.
Rounded corners: Apply rounded corners to images.
Viewable posts: Check how many posts can be viewed at one time.
These CSS and React state settings can be used to update the layout dynamically based on the user’s preferences.
Deploying Your Shopify App
Once your app is fully developed and tested, you can deploy it to any store created in Shopify. Here’s a brief overview of the deployment process:
- Build Your App: Run the build command to prepare your app for production.
- Upload to Shopify: Use the Shopify CLI or Partner Dashboard to upload your app to the Shopify store.
- Submit for Review: If you intend to publish your app on the Shopify App Store, submit it for review to ensure it meets Shopify’s standards and guidelines.
How to Maximize Your Shopify Partner account?
Promote your services: Use the Shopify Partner Dashboard to promote your design services, apps or themes. Emphasize what makes your offers unique and how they benefit Shopify merchants.
Use Shopify’s resources: Take advantage of the training materials and support provided. These resources will help you stay up to date with Shopify’s latest features and best practices.
Connect with the community: Join the Shopify forums and partner communities to connect with other professionals. Sharing knowledge and learning from others can help you improve your services and grow your business.
Track Your Performance: Monitor your earning potential and performance with the Affiliate Dashboard. This will help you understand what is working and where you can make improvements..
Conclusion
Creating a Shopify app involves several key steps, from setting up your development environment to deploying your app. By following this comprehensive guide, you can create a functional and customizable app to meet various needs. Our example of an Instagram feed app demonstrates how you can integrate third-party services and enhance your app’s functionality, offering users a dynamic and engaging experience. Whether you’re a seasoned developer or just starting, Shopify provides the tools and resources to help you succeed


